はじめに
最近発表されたAWSの新サービス「AWS App Runner」
コンテナ化したウェブアプリケーションを直接デプロイできるフルマネージドなサービス。
近いところで言うとGCPの「Cloud Run」のAWS版といった感じです。
こいつは便利そうだぜ。。。というわけで、さっそく試してみることにしました。
Copilot
コンソール画面からポチポチしても良かったのですが、これに合わせてかCopilotのバージョンも上がり、「AWS App Runner」にも対応しているとのことなので、こちらも試してみることにしました。(ちなみに、私は今回初めてCopilotを使います)
Copilotは、コンテナアプリケーションのビルド、 リリース、運用を更に加速させたいという思いから産まれたCLIツールだそうです。詳細は以下を参照ください。
aws.github.io
コンテナ
今回は、簡単にNginxのコンテナをアップします。
// Dockerfile
FROM alpine:latest

# nginxのインストール
RUN apk update && \
    apk add --no-cache nginx

# ドキュメントルート
ADD app /app
ADD default.conf /etc/nginx/conf.d/default.conf

# ポート設定
EXPOSE 80

RUN mkdir -p /run/nginx

# フォアグラウンドでnginx実行
CMD nginx -g "daemon off;"
// default.conf
server {
        listen 80 default_server;
        listen [::]:80 default_server;

        root /app;

        location / {
        }
}
// app/index.html
<h1>Copilot - App Runner</h1>
デプロイ
copilot init を入力すると、名前(Application Name, Service Name)とDockerfileを指定すればデプロイが始まります。(はやぃ・・・)
$ copilot init
Note: It's best to run this command in the root of your Git repository.
Welcome to the Copilot CLI! We're going to walk you through some questions
to help you get set up with a containerized application on AWS. An application is a collection of
containerized services that operate together.
Application name: sample-app
Workload type: Request-Driven Web Service
Service name: nginx
Dockerfile: ./Dockerfile
Ok great, we'll set up a Request-Driven Web Service named nginx in application sample-app listening on port 80.
✔ Created the infrastructure to manage services and jobs under application sample-app.
✔ Wrote the manifest for service nginx at copilot/nginx/manifest.yml
Your manifest contains configurations like your container size and port (:80).
✔ Created ECR repositories for service nginx.
All right, you're all set for local development.
Deploy: Yes
✔ Linked account XXXXXXXXXXX and region ap-northeast-1 to application sample-app.
✔ Proposing infrastructure changes for the sample-app-test environment.
- Creating the infrastructure for the sample-app-test environment. [create complete] [83.3s]
- An IAM Role for AWS CloudFormation to manage resources [create complete] [22.0s]
- An ECS cluster to group your services [create complete] [11.0s]
- Enable long ARN formats for the authenticated AWS principal [create complete] [2.4s]
- An IAM Role to describe resources in your environment [create complete] [22.2s]
- A security group to allow your containers to talk to each other [create complete] [4.4s]
- An Internet Gateway to connect to the public internet [create complete] [16.5s]
- Private subnet 1 for resources with no internet access [create complete] [18.7s]
- Private subnet 2 for resources with no internet access [create complete] [18.7s]
- Public subnet 1 for resources that can access the internet [create complete] [18.7s]
- Public subnet 2 for resources that can access the internet [create complete] [18.7s]
- A Virtual Private Cloud to control networking of your AWS resources [create complete] [16.5s]
✔ Created environment test in region ap-northeast-1 under application sample-app.
Environment test is already on the latest version v1.4.0, skip upgrade.
[+] Building 2.8s (11/11) FINISHED
=> [internal] load build definition from Dockerfile 0.0s
=> => transferring dockerfile: 356B 0.0s
=> [internal] load .dockerignore 0.0s
=> => transferring context: 2B 0.0s
=> [internal] load metadata for docker.io/library/alpine:latest 2.0s
=> [auth] library/alpine:pull token for registry-1.docker.io 0.0s
=> [1/5] FROM docker.io/library/alpine:latest@sha256:69e70a79f2d41ab5d637de98c1e0b055206ba40a8145e7bddb55ccc04e13cf8f 0.0s
=> [internal] load build context 0.0s
=> => transferring context: 277B 0.0s
=> CACHED [2/5] RUN apk update && apk add --no-cache nginx 0.0s
=> [3/5] ADD app /app 0.0s
=> [4/5] ADD default.conf /etc/nginx/conf.d/default.conf 0.0s
=> [5/5] RUN mkdir -p /run/nginx 0.5s
=> exporting to image 0.1s
=> => exporting layers 0.1s
=> => writing image sha256:caf72e9509ffe1e28b2070021afe000b6304b8a1fda457160f373aa2d38f4f2c 0.0s
=> => naming to XXXXXXXXXXX.dkr.ecr.ap-northeast-1.amazonaws.com/sample-app/nginx 0.0s
Login Succeeded
Using default tag: latest
The push refers to repository [XXXXXXXXXXX.dkr.ecr.ap-northeast-1.amazonaws.com/sample-app/nginx]
4056d7cdbba7: Pushed
27836a6a132d: Pushed
1d8fedb1407f: Pushed
4f56318aa220: Pushed
b2d5eeeaba3a: Pushed
latest: digest: sha256:81d1c8846ae62ca6c4e86bd5c277b65b9e5ef8ec088df9be4e4e5422c8099b89 size: 1360
✔ Proposing infrastructure changes for stack sample-app-test-nginx
- Creating the infrastructure for stack sample-app-test-nginx [create complete] [290.1s]
- An IAM Role for App Runner to use on your behalf to pull your image from ECR [create complete] [20.1s]
- An IAM role to control permissions for the containers in your service [create complete] [20.1s]
- An App Runner service to run and manage your containers [create complete] [258.6s]
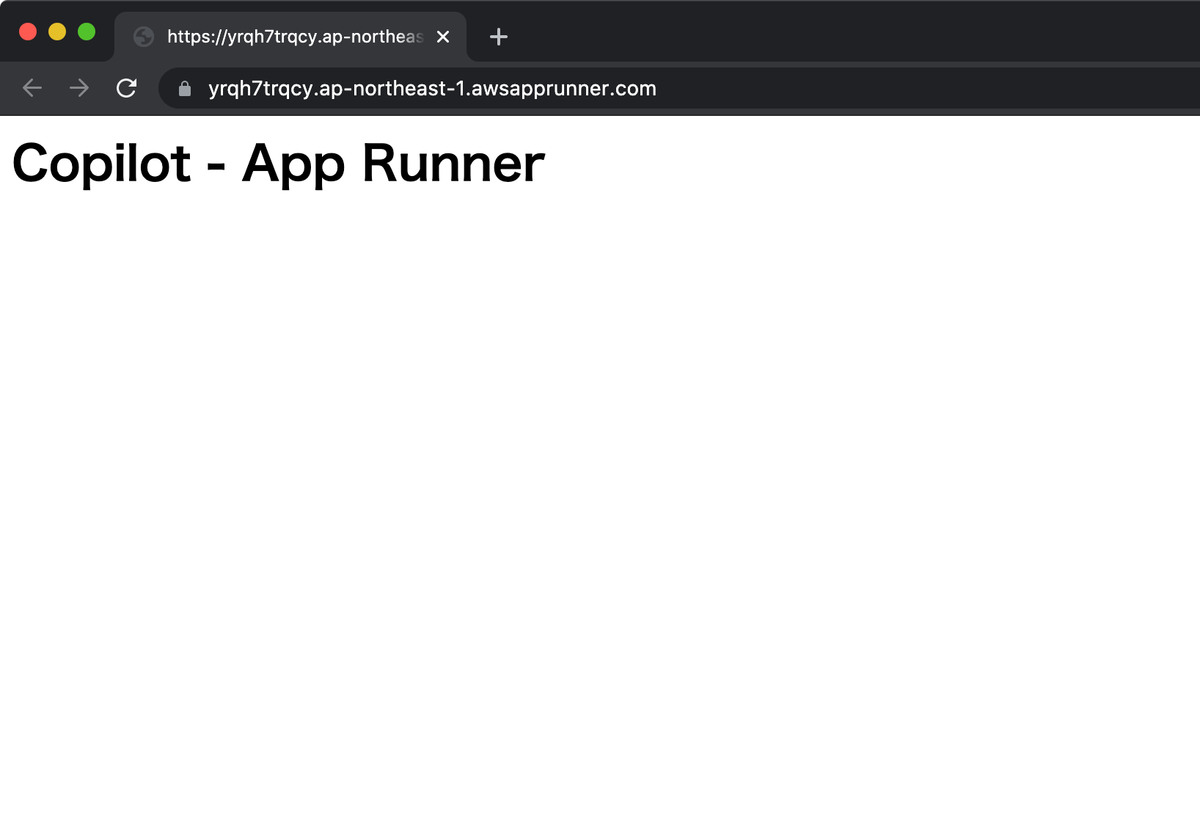
✔ Deployed nginx, you can access it at https://yrqh7trqcy.ap-northeast-1.awsapprunner.com.
$
作成されたURLに接続すると・・・見れました。
デプロイ成功です。
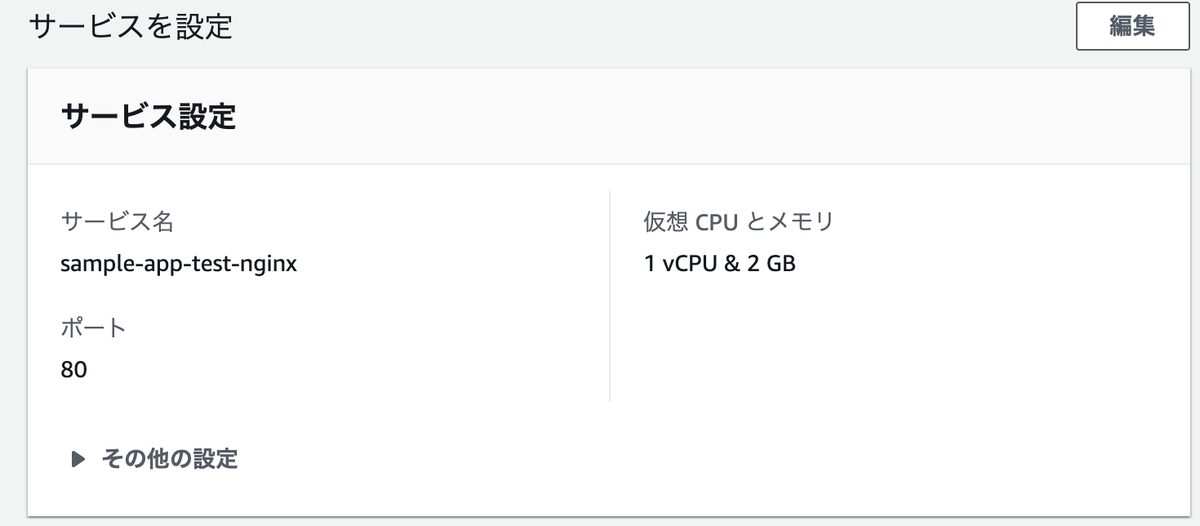
「AWS App Runner」の設定もコンソール画面から見てみると、構成(CPU/メモリ)は最小のようですね。
Copilotは、コンテナに特化しているCLIツールだけあって、CDKを使って書くよりも全然早い。。。裏側ではCloudFormationのテンプレートを作成して、それを使ってデプロイを行っている模様。
デプロイしたリソースの削除もcopilot app deleteコマンドで一発削除。
$ copilot app ls
sample-app
$ copilot app delete --name sample-app
Are you sure you want to delete application sample-app? Yes
✔ Deleted service nginx from environment test.
✔ Deleted resources of service nginx from application sample-app.
✔ Deleted service nginx from application sample-app.
✔ Deleted environment test from application sample-app.
✔ Cleaned up deployment resources.
✔ Deleted application resources.
✔ Deleted application configuration.
✔ Deleted local .workspace file.
$
感想
「AWS App Runner」は、まさにGCPの「Cloud Run」のAWS版。Copilotを使用することで、CLIによるデプロイも可能。
気になる料金ですが、「AWS App Runner」はコンテナインスタンスを0にすることはできない模様。なので、最低1つのコンテナは動き続ける分、課金が発生します。
0.009 USD/GB/時なので、0.009 * 2(最小構成が2GB) * 24時間 * 30日 = 約 13 USD/月といったところでしょう。うーん、これならGCPの「Cloud Run」の方が低コストですね。。。
でも、AWSには他の様々なサービスと連携できるメリットもあるので、「AWS App Runner」という新しい選択肢ができた。というだけでも、素晴らしい事だと思います。
今後は、ちょっと試したい!ちょっと動かして確認したい!ってな時に「AWS App Runner」を使う機会はやってくでしょう!!いやぁ、便利なサービスがまた1つできましたね(= =)ノ
)")
